Playframework is a lightweight, high-performance web application platform that's perfect for a stateless web tier. It's an amazing compliment to AWS Elastic Beanstalk. This article outlines how you can use Jenkins to build and deploy your Playframework application to AWS Elastic Beanstalk. The article assumes Playframework version 2.3+ and has been tested on 2.3, 2.4 and 2.5.
Step 1: Preparing your Playframework project
We'll make a few changes to our Playframework project in order to prepare it for deployment on Elastic Beanstalk using the new "Java SE" container types.
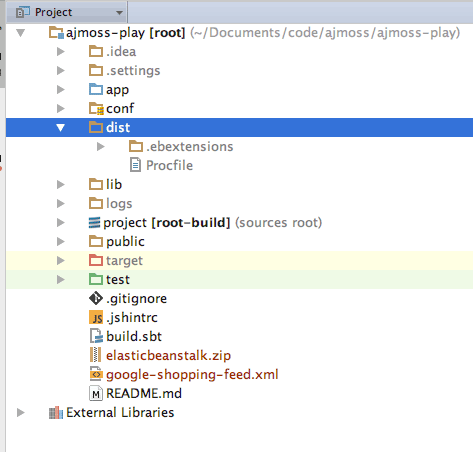
Create a directory named dist in the top level of your project. Inside you'll have a .ebextensions directory and a Procfile which will tell ElasticBeanstalk how to launch your app.
Populate Procfile with the following, changing the ./bin/ajmoss to reflect your application name defined in build.sbt and -Dconfig.file=conf/live.application.conf to the Typesafe configuration file appropriate to your environment.
web: ./bin/ajmoss -Dhttp.port=5000 -Dconfig.file=conf/live.application.conf
OK. That's it. You're ready to deploy to ElasticBeanstalk. The Java SE containers use nginx as a reverse proxy to your application which by default proxies port 5000. If your application requires a custom nginx conf you can totally customize the reverse proxy using these instructions.
Step 2: Creating and Configuring your Jenkins Instance
If you don't have a Jenkins instance in AWS, you'll want to install jenkins as outlined in this article.
You'll also want to install the Oracle JDK 8 on your Jenkins instance. The OpenJDK version drops support for some encryption ciphers the Elastic Beanstalk Plugin depends on.
Next install Typesafe Activator to build playframework projects:
sudo cd /opt/
sudo wget https://downloads.typesafe.com/typesafe-activator/1.3.7/typesafe-activator-1.3.7-minimal.zip
sudo unzip typesafe-activator-1.3.7-minimal.zip
sudo ln -s activator-1.3.7-minimal activator
sudo touch /etc/profile.d/activator.sh
sudo chmod +x /etc/profile.d/activator.sh
sudo echo 'export PATH=$PATH:/opt/activator/' >> /etc/profile.d/activator.sh
sudo source /etc/profile.d/activator.sh
sudo chown jenkins /opt/activator/activator
sudo chgrp jenkins /opt/activator/activator
Now activator is installed on the system.
You'll want to install the AWS Elastic Beanstalk Deployment Plugin.
Now we're ready to create our Jenkins job. Setup your source code management to connect to your repository. I use github + the Git Plugin to check out sources.
Next create a build step that is going to build our project into a zip file for distribution. We'll use an "Execute Shell" step with the following bash commands:
/opt/activator/activator clean dist
mv target/universal/*.zip target/elasticbeanstalk.zip
Finally, we'll add an additional build step for "AWS Elastic Beanstalk". We'll need to do a little prep work for this part.
Step 3: Preparing your AWS Account
In AWS you'll need to create a Jenkins access key/secret key pair with the authority to manage Elastic Beanstalk resources. You'll also need to provision an S3 bucket that we'll be using to upload our builds and grant your Jenkins user permission to upload to that resource. An easy way to do this is to apply the policy directly to the S3 Bucket as in the following example policy:
{
    "Version": "2008-10-17",
    "Id": "Policy1400141113811",
    "Statement": [
        {
            "Sid": "Stmt1400141111261",
            "Effect": "Allow",
            "Principal": {
                "AWS": "arn:aws:iam::603736890550:user/jenkins"
            },
            "Action": [
                "s3:DeleteObject",
                "s3:GetObject",
                "s3:PutObjectAcl",
                "s3:PutObject"
            ],
            "Resource": "arn:aws:s3:::ajmoss-artifacts/*"
        }
    ]
}
Note: in this example policy my S3 bucket is named 'ajmoss-artifacts'.
Step 4: Configuring the AWS Elastic Beanstalk Build Step
OK, now to configure Jenkins. In our build step for "AWS Elastic Beanstalk" we'll configure each section.
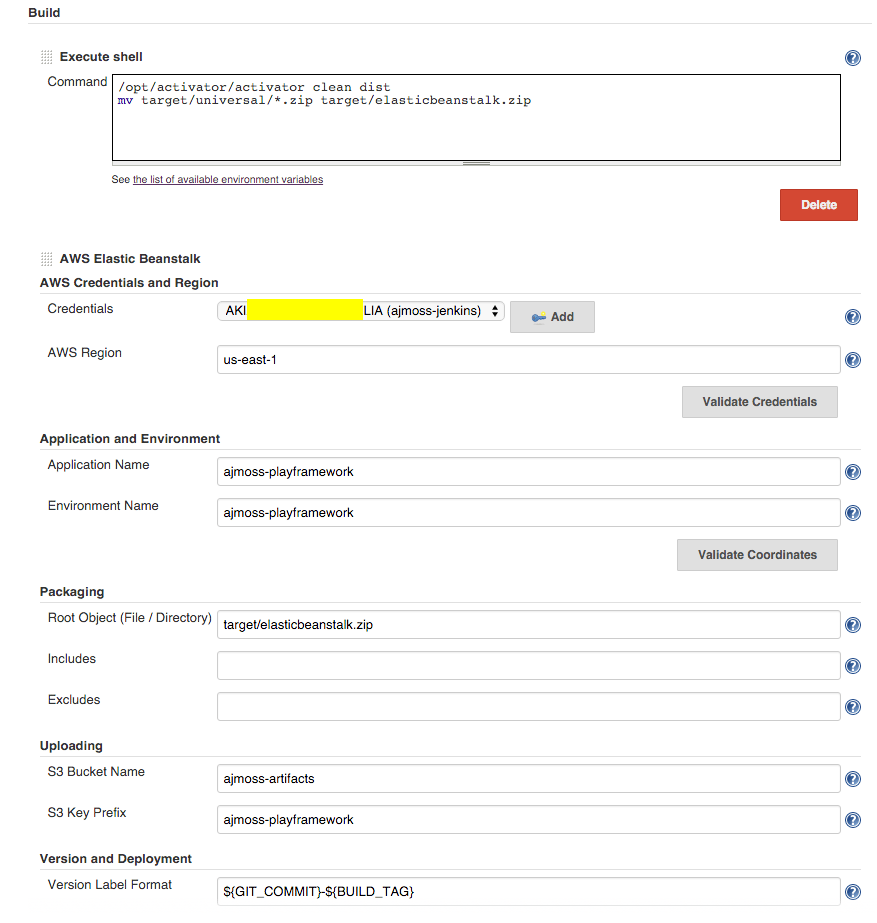
In "AWS Credentials and Region" enter your access key / secret key and the AWS region your Elastic Beanstalk VPC is located.
In "Application and Environment" enter the name of the EB resource you want to deploy to.
In "Packaging" configure the root object as target/elasticbeanstalk.zip. You can leave includes and excludes blank (for now).
In "Uploading" you'll configure your S3 bucket to upload builds to as well as an "S3 Key Prefix" which is essentially a directory within which builds for this Jenkins job will live.
In "Version and Deployment" you can configure how each build is named. I'm currently using ${GIT_COMMIT}-${BUILD_TAG} which will include the git commit hash plus the build tag from Jenkins.
If you check "Zero downtime?" Elastic Beanstalk will spin up a copy of your existing Environment, execute the deployment and swap DNS entries. I typically always promote to a test environment and then later to live so I leave this blank.
Step 5: Kick Ass
That's it! Click build and enjoy a one click deployment for all your Elastic Beanstalk applications :)
comments powered by Disqus